
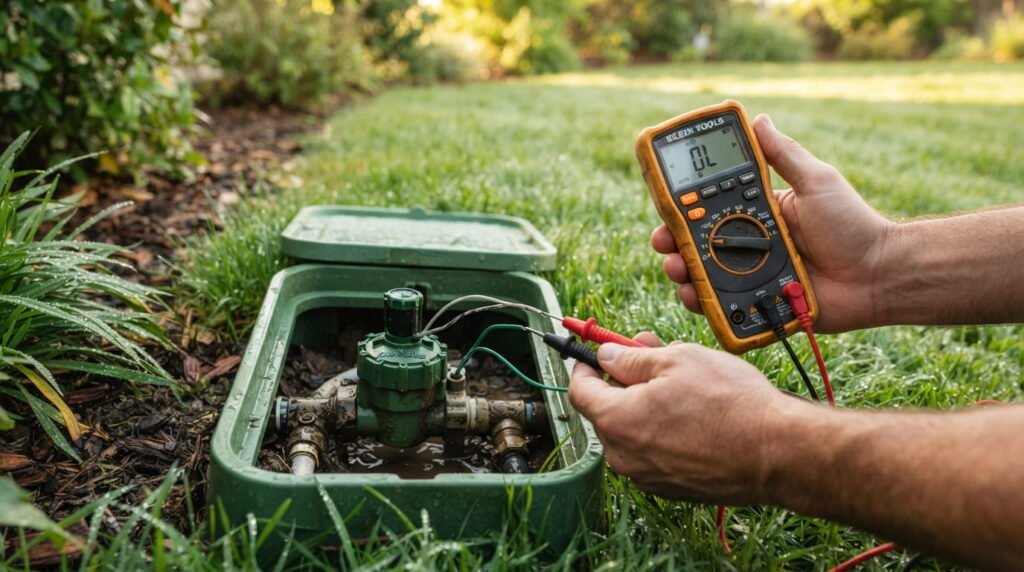
For sprinkler system electrical troubleshooting, turn off power, then check in order: the controller’s power and fuse, the transformer’s 24-volt output, the zone wires, and finally each valve solenoid with a multimeter. A normal zone circuit reads roughly 20–60 ohms; near zero means a short, and infinity means a broken wire.
This guide covers standard 24-volt AC lawn sprinkler systems (the kind with a wall-mounted controller and valves in the yard). It does not cover fire sprinkler systems or battery-powered hose-end timers. Follow the steps in order, because each one rules out a part of the system.
Table of Contents
How Do You Do Sprinkler System Electrical Troubleshooting?
To troubleshoot sprinkler system electrical problems, turn off power, then check in order: the controller’s power and fuse, the transformer’s 24-volt output, the zone wires, and finally each valve solenoid with a multimeter. A normal zone circuit reads roughly 20–60 ohms; near zero means a short, and infinity means a broken wire.
Here is the short version:
- Turn off the power and unplug the controller before touching any wiring.
- Check the outlet, breaker, and controller fuse.
- Measure the transformer’s output at the controller terminals (about 24 volts AC).
- Rule out the rain sensor by switching it to bypass.
- Measure each zone’s resistance (ohms) from the controller.
- Test the solenoid at the valve and repair any bad wire or splice.
Safety First: Know Which Wires Carry What Voltage
A sprinkler system has two very different electrical sides:
- The power side: the wall outlet and the transformer, which run on household current (roughly 110–130 volts in the US).
- The field side: the wires running out to your valves, which carry low-voltage 24-volt AC.
The field wiring is much lower risk, but the power side is not. Some tests below (checking the outlet and transformer output) need the system powered, so keep your hands off exposed terminals and use insulated tools. Everything else should be done with the controller unplugged.
If you see burn marks, melted plastic, or water inside the controller, stop and call a licensed electrician or irrigation technician. For general home electrical safety, including outdoor outlets and GFCI protection, the Electrical Safety Foundation International is a solid reference.
The 3-Part Rule: Controller, Field Wiring, Solenoid
Irrigation trainers boil the electrical side of a sprinkler system down to three parts: the controller (with its transformer), the field wiring (the wires in the ground), and the solenoid (the small electromagnet on each valve). Your job is to eliminate one at a time until only the faulty part is left.
You need only a few things:
- A digital multimeter that reads AC volts and ohms
- A small screwdriver
- Waterproof wire connectors (for repairs)
- A few feet of spare irrigation wire (optional)
Symptom Finder: What Is Your Sprinkler Doing?
Find your symptom, then jump to the matching step.
The controller screen is blank. Go to Step 1 (power), then Step 2 (transformer).
No zones run at all, but the controller screen is on. Check the rain sensor (Step 3), then the transformer output (Step 2). A bad common wire can also stop every zone, so Step 4 matters too.
Only one zone won’t run. The problem is almost always that zone’s wire or solenoid. Go to Steps 4 and 5.
The fuse blows or the controller resets when a zone starts. That points to a short, either in the zone wiring or in a solenoid. Go to Step 4.
A valve buzzes or chatters. That usually means resistance is too high somewhere in that zone’s circuit, often a corroded or poorly made splice. See the ohms chart in Step 4.
A valve won’t shut off or run constantly. This is more often mechanical (debris or a worn diaphragm inside the valve) than electrical. See the electrical-vs-mechanical section below.
The system ignores its schedule. Check the programming first, then the rain sensor, then the controller’s backup battery if it has one.
Step 1: Check Power at the Controller
Start with the obvious, because it’s the most common cause.
- Confirm the controller is plugged in and the outlet works. Test the outlet with a lamp or phone charger.
- Check the outlet’s GFCI reset button and your home’s breaker.
- Open the controller and look for a fuse. If it’s blown, replace it with the same rating, but don’t just keep replacing it. A repeatedly blown fuse means there’s a short to find (Step 4).
- Look for burn marks or a burnt smell, which can indicate a power surge.
Step 2: Test the Transformer Output
If the outlet has power but the controller is dead or weak, check what the transformer is delivering.
- Set your multimeter to AC volts.
- Check the outlet first. A healthy US outlet reads roughly 110–130 volts.
- Start a zone manually from the controller.
- Touch the meter probes to the controller’s common terminal and the active zone’s terminal.
A reading of around 23–28 volts AC means the transformer and controller are doing their job. A reading far below that (about 10 volts, for example) points to a bad transformer. On many systems, the transformer is a separate plug-in unit that costs far less than a new controller, so rule it out first.
Step 3: Rule Out the Rain Sensor
A rain or soil moisture sensor can stop every zone from starting. That’s what it’s designed to do, so a faulty or stuck sensor looks like a dead system.
- Find the sensor bypass switch on your controller.
- Switch the sensor to bypass and run a zone manually.
- If the zone now runs, the sensor (or its wiring) is the problem.
- Check the sensor’s wires for breaks or corrosion.
Step 4: Ohm Out Your Zone Wires from the Controller
This is the step that finds most hidden wiring faults, and you can do it without walking the yard.
- Unplug the controller. Resistance tests need the power off.
- Set your meter to ohms.
- Touch one probe to the common terminal.
- Touch the other probe to each zone’s terminal, one at a time, and write down the readings.
Compare your numbers to this chart.
Multimeter Reading Cheat Sheet
| Reading | What it means | What to do |
|---|---|---|
| Outlet about 110–130 VAC | Incoming power is fine | Move on to the controller |
| Controller terminals about 23–28 VAC (zone running) | Transformer and controller are working | Check the field wiring |
| Terminals about 10 VAC or very low | Bad transformer | Replace the transformer |
| Zone circuit about 20–60 ohms | Normal | No electrical fault in that zone |
| About 1–10 ohms | Short (a common cause of blown fuses) | Isolate the wire or solenoid |
| About 70–150 ohms | High resistance, often a bad splice (valve chatter) | Redo the splice |
| “OL,” infinity, or a “k”/”M” suffix | Broken wire | Find the break or use a spare wire |
These ranges come from irrigation-industry training material and are typical, not exact. Solenoid type, wire gauge and wire length all shift the numbers, so check your valve or controller manufacturer’s specs (for example, Rain Bird or Hunter support pages) for your exact model.
Tip on digital meters: If your display shows a small “k” or “M” next to the number (like 256k or 13.5M), that means thousands or millions of ohms, which is effectively an open circuit, so the wire is broken.
Want this as a printable checklist? (Email capture point: add your signup form here, offering the cheat sheet and troubleshooting checklist as a free PDF.)
Step 5: Test the Solenoid at the Valve
Now narrow it down to the wire or the solenoid.
Manual test: Most valves have a bleed screw or a solenoid you can turn a quarter turn to open the valve by hand. If water flows when you open it manually but the valve never opens from the controller, the cause is electrical.
Ohm test at the valve:
- Find the valve box and disconnect the zone’s wires from the solenoid.
- Touch the meter probes to the solenoid’s two wires.
- Compare this reading to the one you took at the controller.
How to read the comparison:
- Normal at the valve but bad at the controller: the solenoid is fine, and the fault is in the field wire or a splice.
- Bad at the valve (very low or infinite): the solenoid itself has failed and needs replacing.
Step 6: Find and Fix a Broken Wire or Bad Splice
Once you know a wire is the problem, you have a few options.
- Check the usual suspects first: splices in valve boxes, corroded connectors, and spots where the wire was cut by a shovel or chewed by rodents.
- Use a spare wire: many multi-conductor irrigation cables include unused spare wires. If one is available, you can connect it at both ends in place of the damaged one and skip digging.
- Replace bad splices with waterproof connectors designed for irrigation. Water and ordinary wire nuts don’t mix for long.
- Hidden underground break? Pinpointing it can require a wire locator. If you can’t find it, this is a good time to call a pro.
Is It Electrical or Mechanical?
Sometimes the answer is “neither of the above”. If every zone reads in the normal range, the controller puts out about 24 volts, and the solenoid opens by hand but a valve still won’t flow, the fault is likely mechanical (a clogged or damaged valve). Trust your readings: if the electrical checks all pass, stop hunting for an electrical problem.
For more on valves, see our guide to best water sprinkler timers for the controller side of watering control.
When the Controller Really Is the Problem
Controller failure is less common than wiring or solenoid trouble, so only land on this conclusion after the earlier steps. But if the outlet is good, the transformer is good, and the controller still won’t power up or send voltage to the terminals, the controller itself has likely failed (from a surge, water damage or age).
At that point, replacing it is usually simpler than repairing it. Our guide to the best programmable sprinkler timers compares options by zones, indoor or outdoor mounting, and ease of setup. If you want a simpler interface, our roundup of best digital sprinkler timers is another place to start. If you’re considering a smart controller, the EPA’s WaterSense programme explains how weather-based irrigation controllers can reduce outdoor water waste.
When to Call a Professional
Call a licensed electrician or irrigation technician if:
- You see burn marks, melted parts or water inside the controller
- The problem is on the household-voltage side (outlet, breaker, or hardwired controller wiring).
- You’ve run through all six steps and still can’t find the fault
- You suspect an underground wire break you can’t locate.
- You simply aren’t comfortable working near electrical connections.
The Irrigation Association is a good place to look for qualified irrigation professionals.
Frequently Asked Questions
Why is my sprinkler controller not turning on?
Start with the outlet, GFCI and breaker, then the controller’s fuse. If those are fine, check the transformer’s output. A failed transformer is a common reason a controller goes dark.
How many volts is a sprinkler system?
The valves run on 24-volt AC. The controller’s transformer steps household current (about 110–130 volts) down to roughly 23–28 volts at the terminals.
Why does my sprinkler controller keep blowing fuses?
Usually a short: either a damaged zone wire or a failed solenoid. Ohm out each zone (Step 4). A reading around 1–10 ohms flags the problem zone.
Why won’t just one sprinkler zone turn on?
When only one zone fails, the cause is almost always that zone’s wire, splice or solenoid. Compare the ohm reading at the controller to the reading at the valve to see which.
Why does my sprinkler valve buzz or chatter?
Chatter usually means too much resistance in the circuit, often from a corroded or poor splice. Readings around 70–150 ohms are a typical sign.
How do I find a broken sprinkler wire?
A reading of “OL” or infinity confirms a break. Check splices and any recently dug areas first, try a spare wire in the cable, or call a pro with a wire locator for hidden breaks.
Do I need an electrician or an irrigation technician?
For household-voltage problems, an electrician is the right call. For zone wiring, solenoids and valves, an irrigation technician is usually the better fit.
What to Read Next
Once the electrical fault is fixed, you might want to upgrade the brain of your system. Browse our best programmable sprinkler timers, the best digital sprinkler timers, and the best water sprinkler timers.