
Introduction
If your lawn has dry patches on one side and soggy grass on the other, your Rain Bird sprinkler heads probably need adjusting. The good news? You don’t need to call a professional or spend hours troubleshooting. With the right technique and a few minutes per zone, you can dial in perfect coverage across your entire yard.
This guide walks you through exactly how to adjust Rain Bird sprinkler heads — whether you’re dealing with a rotor, spray head, rotary nozzle, or the popular 5000 Series — so every inch of your lawn gets the water it needs.
Table of Contents
What You’ll Need Before You Start
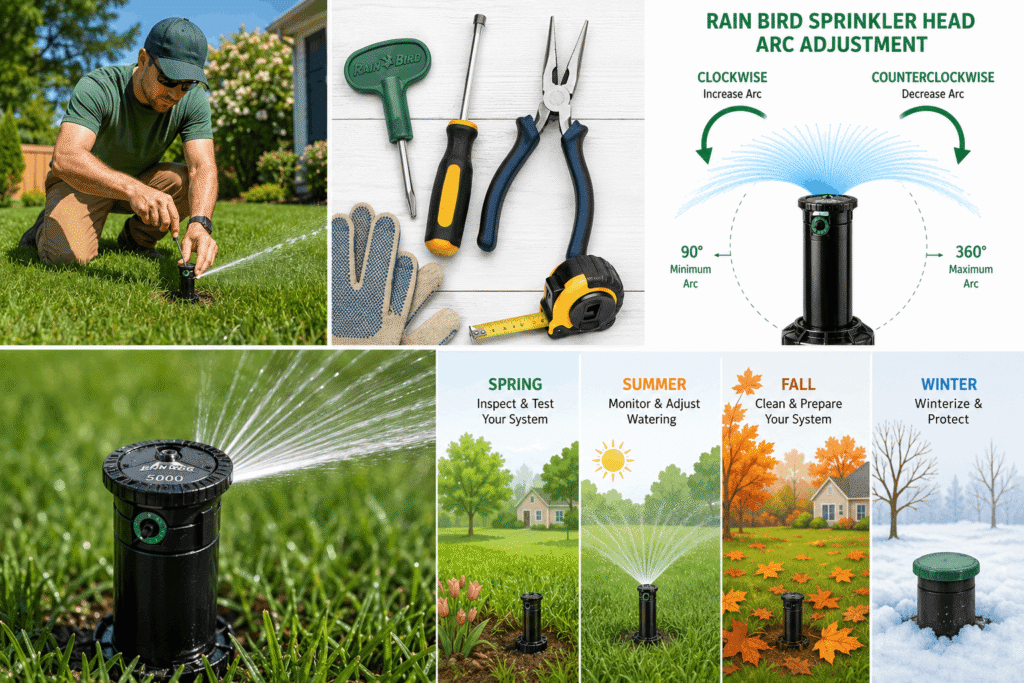
Gather these tools before heading outside:
- Rain Bird adjustment tool (usually comes with the sprinkler head; also available at most hardware stores)
- Flathead screwdriver (for minor tweaks)
- Needle-nose pliers (for stuck heads)
- Work gloves
Optional but helpful:
- Marker flags to track spray edges
- Measuring tape to check throw distance
- A pressure gauge to verify water pressure (ideal range: 25–45 PSI for rotors, 15–30 PSI for spray heads) Rain Bird’s official site lists recommended PSI for every model
Safety tip: Turn on the irrigation zone and let the heads pop up before making adjustments. Never force a head that won’t rise – it may be clogged or damaged.
Understanding Your Rain Bird Sprinkler Head Type
Before adjusting anything, identify which type of head you have. Each one adjusts differently.
Rain Bird Rotor Heads
These rotate slowly while spraying water in a wide arc. Best for large open lawns. They allow both arc and distance adjustments.
Rain Bird Spray Heads
Fixed-pattern heads that spray a fan of water without rotating. Common in flower beds, narrow strips, and smaller lawn areas. The arc is controlled by swapping nozzles, not turning a screw.
Rain Bird Rotary Nozzles
A hybrid between spray and rotor. They distribute water slowly and evenly, which reduces runoff on clay soils. Adjustable for both arc and radius.
Rain Bird 5000 Series Rotors
The most popular residential rotor in the U.S. has an adjustable arc from 40° to 360° with a built-in radius reduction screw. This guide covers it in detail below.
How to Adjust Rain Bird Rotor Sprinkler Heads
Step 1: Locate the adjustment socket.
Look for a small socket on the top of the sprinkler head. Insert your Rain Bird adjustment tool here — this is your control point for both arc and direction.
Step 2: Set the left fixed stop.
Every Rain Bird rotor has a fixed left stop — the starting point of the spray arc. Rotate the turret by hand (anticlockwise) until it stops. This is your left boundary. Align it with the left edge of the area you want to water.
Step 3: Adjust the Arc Width
With the adjustment tool inserted:
- Turn clockwise to increase the arc
- Turn anticlockwise to decrease it
Most rotors adjust in a range of 40° to 360°. For a corner lot, you might set 90°. For a wide-open backyard, 180° or more.
Tip: Each full rotation of the adjustment tool moves the arc by roughly 90°. Make one turn, run the zone, and check before turning again.
Step 4: Reduce Spray Distance (If Needed)
Locate the radius reduction screw on top of the nozzle. Turn it clockwise to shorten the throw. You can reduce spray distance by up to 25% without hurting performance.
This is especially useful near sidewalks, driveways, or fences.
Step 5: Run and Test
Turn on the zone and watch the full rotation. Look for:
- Dry spots between heads
- Overspray onto pavement
- Uneven arcs
Make small tweaks and retest until coverage is even.
How to Adjust Rain Bird 5000 Series Rotor Heads
The Rain Bird 5000 is the gold standard for residential irrigation in the United States. Here’s how to get it dialled in:
Step 1: Find the Fixed Left Stop
Grip the top of the sprinkler head (the turret) and rotate it to the left until it stops. This is your fixed starting point — it cannot be moved.
Step 2: Align the Left Stop to Your Watering Zone
Physically rotate the entire sprinkler body (not just the turret) so the left stop lines up with the left edge of your lawn or garden bed. You may need to loosen the head from the riser slightly to do this.
Step 3: Set the arc.
Insert the Rain Bird adjustment tool into the arc adjustment socket (the small + shaped slot on top).
- Clockwise = wider arc
- Anticlockwise = narrower arc
Arc settings range from 40° minimum to 360° full circle.
Step 4: Adjust the Radius
The radius screw is located in the centre of the nozzle. Turn it clockwise to reduce throw distance. You can cut distance by up to 25% to keep water off the driveway or the sidewalk.
Step 5: Test the System
Run the zone for 3–5 minutes. Walk around and look at where the water lands. Fine-tune arc and radius until coverage is consistent and there’s no overspray.
How to Adjust Rain Bird Rotary Nozzles
Rotary nozzles (like the Rain Bird R-VAN series) are installed on standard spray head bodies but work very differently.
Adjusting the Arc
Hold the nozzle body steady and use the adjustment key to set the arc:
- Most rotary nozzles adjust from 45° to 270° (check your specific model).
- Rotate the arc collar according to the manufacturer markings.
Adjusting the Radius
Find the small radius adjustment screw:
- Clockwise = shorter throw
- Anticlockwise = longer throw
Rotary nozzles are designed to apply water at a slower rate than spray heads, which means less runoff — a big advantage for slopes or compacted soil.
Overlap Check
After adjusting, make sure adjacent nozzles overlap by 30–50%. This prevents dry strips between heads.
Fixing Common Rain Bird Sprinkler Problems
Problem: Head Won’t Rotate
Cause: Clogged filter, worn gears, or low pressure
Fix:
- Shut off the zone
- Unscrew the head from the riser
- Remove the filter screen and rinse it clean.
- Reinstall and test — if still not rotating, replace the internal gear drive (~$8–15 at most hardware stores).
Problem: Water Spraying the Sidewalk
Fix:
- Reduce the arc so it doesn’t sweep towards the pavement
- Turn the radius screw clockwise to shorten the throw.
- Check that the head is sitting perfectly vertical — a tilted head changes where water lands.
Problem: Uneven Water Distribution
Fix:
- Check for clogged nozzles — remove and rinse under running water
- Verify your water pressure is in the correct range (use a gauge at the hose bib).
- Confirm adjacent heads have proper overlap (30–50%)
Problem: Head Stuck Down and Won’t Pop Up
Fix:
- Clear any grass, mulch, or debris from around the head
- Try pressing it down firmly, then release — this can dislodge debris in the riser.
- If the seal is cracked or the riser is broken, replace the full head unit.
Problem: Low Spray Distance
Fix:
- Check if the radius reduction screw has been turned too far clockwise — back it off anticlockwise.
- Inspect for partially closed zone valves
- Verify pressure — below 25 PSI will noticeably reduce throw distance.
If low pressure is a recurring issue across multiple zones, read our detailed guide on how to increase sprinkler water pressure to find and fix the root cause.
How Often Should You Adjust Rain Bird Sprinkler Heads?
For most U.S. homeowners, a twice-yearly inspection is enough:
| Season | What to Check |
|---|---|
| Spring | Arc, radius, alignment, clogged nozzles, pressure |
| Summer | Coverage gaps, overspray, leaks |
| Fall | System performance before winterization |
| Winter | Drain lines, protect exposed components |
If your system has a pressure regulator, check it every spring — a failing regulator causes inconsistent performance across all zones. Also make sure your backflow preventer is working correctly to protect your home’s water supply.
When to Replace Instead of Adjust
Adjustment only gets you so far. Replace a Rain Bird sprinkler head if you notice the following:
- Cracked housing or broken riser
- Consistent failure to rotate despite cleaning
- Severe leaking around the base
- Nozzle that won’t stay in position
Replacement heads typically cost $5–20, which is far cheaper than the water waste a broken head creates over a season.
Final Tips for Perfect Coverage
- Don’t make large adjustments all at once. One small turn, then test. Repeat.
- Check for pressure issues first if multiple heads underperform—it’s a system problem, not a head problem.
- Match nozzle types within a zone — mixing rotors and spray heads in the same zone creates pressure imbalances.
- Overlap matters — aim for 30–50% overlap between adjacent heads for even coverage.
Adjusting Rain Bird sprinkler heads is one of the simplest ways to protect your lawn investment and lower your water bill. Once you’ve done it once, the whole process takes less than 10 minutes per zone. Take the time to get it right, and your grass will show the difference by the end of the week.
Frequently Asked Questions (FAQ)
Q1: How do I adjust a Rain Bird sprinkler head without a special tool?
You can use a flathead screwdriver for minor arc and radius adjustments on most Rain Bird heads. However, the official Rain Bird adjustment tool gives you far more precision and reduces the risk of stripping the adjustment socket. It’s inexpensive and available at Home Depot, Lowe’s, or online for under $5 — worth having in your toolkit.
Q2: How do I know if my Rain Bird sprinkler arc is set correctly?
Run the zone and watch one full rotation. The head should sweep from your left boundary to your right boundary—covering only your lawn or garden, not pavement or neighboring property. If it overshoots or undershoots, adjust the arc by one small turn at a time and retest.
Q3: Why does my Rain Bird 5000 only spray in one direction and not rotate?
This usually means the arc is set too narrow (close to 0°) or the internal gear is clogged or worn. First, try inserting the adjustment tool and turning clockwise to open the arc wider. If it still won’t rotate, remove the head, clean the filter screen, and reinstall. A gear kit replacement ($8–15) fixes the problem if cleaning doesn’t help.
Q4: How far should Rain Bird sprinkler heads be spaced apart?
Most Rain Bird rotors have a throw distance of 25–50 feet depending on water pressure and nozzle size. For even coverage, space heads so their spray patterns overlap by 30–50%. If one head throws 30 feet, the next head should be no more than 20–22 feet away.
Q5: Can I reduce the spray distance on a Rain Bird sprinkler head?
Yes. Every Rain Bird rotor and rotary nozzle has a radius reduction screw on top of the nozzle. Turn it clockwise to shorten the throw—you can safely reduce distance by up to 25% without affecting water distribution quality.
Q6: Why is my Rain Bird sprinkler head leaking at the base?
Leaking at the base usually means a worn or cracked seal inside the riser. Turn off the zone, unscrew the head, and inspect the seal. If it’s damaged, replace the entire head—they’re inexpensive, and the repair is straightforward.
Q7: How do I stop my Rain Bird sprinkler from watering the sidewalk?
Two adjustments fix this: First, reduce the arc so the head doesn’t sweep toward the pavement. Second, turn the radius reduction screw clockwise to shorten the throw distance. Also verify the head is perfectly vertical—even a slight tilt can send water several feet off target.
Q8: What water pressure do Rain Bird sprinkler heads need?
- Rotor heads (including 5000 Series): 25–45 PSI
- Spray heads: 15–30 PSI
- Rotary nozzles: 20–30 PSI
If your pressure is outside this range, performance will suffer regardless of how well the head is adjusted. Use a simple pressure gauge at your hose bib to check.
Q9: How long do Rain Bird sprinkler heads last?
With regular maintenance, Rain Bird sprinkler heads typically last 10–15 years. Heads in high-traffic areas or those exposed to heavy debris may wear faster. If a head needs constant readjustment or develops cracks, it’s time to replace it.
Q10: Do I need to adjust sprinkler heads every season?
Not necessarily every season, but a spring and fall inspection is strongly recommended. Spring checks ensure everything survived winter. Fall checks prepare the system for winterization. After any significant landscaping or lawn work, do a quick visual check to make sure heads weren’t bumped or shifted.
Conclusion
Knowing how to adjust Rain Bird sprinkler heads is one of the most valuable skills any homeowner can have. A few minutes of careful adjustment can eliminate dry patches, stop water waste, lower your utility bill, and keep your lawn looking great all season long.
The process is straightforward: identify your sprinkler head type, set the left fixed stop, dial in the arc, adjust the radius if needed, and always test after every change. Whether you’re working with a Rain Bird 5000 rotor, a rotary nozzle, or a basic spray head, the same principles apply: small adjustments, frequent testing, and consistent seasonal maintenance.
Don’t wait until your lawn is showing stress or your water bill spikes. Take 20 minutes this weekend, walk your irrigation zones, and make the adjustments that will protect your landscape investment for years to come.
When fall arrives, make sure you also winterize your sprinkler system properly — or learn how to blow out your lawn sprinkler system to prevent freeze damage.
At HydroSprinkler, we believe every homeowner deserves a lawn that thrives — and it starts with a sprinkler system that actually works. If you have questions about your specific setup, explore our other guides or reach out to our team for personalized advice.