
Introduction
If you live in a region where temperatures drop below freezing, learning how to winterise a sprinkler system is essential. When water freezes, it expands—and that can crack pipes, damage valves, and destroy your entire irrigation system.
The good news? You don’t need to be an expert to protect your system. With the right steps and a little preparation, you can safely winterise your sprinkler system and avoid expensive repairs in spring.
If you’re new to irrigation, first read this complete guide on How to Install a Sprinkler Irrigation System
In this complete beginner-friendly guide, you’ll learn exactly how to winterise a sprinkler system, what tools you need, when to do it, and the most common mistakes to avoid. Whether you’re a homeowner or DIY enthusiast, this guide will help you do it the right way.
Table of Contents
What Does It Mean to Winterise a Sprinkler System?
Winterising a sprinkler system means removing all water from the pipes, valves, and sprinkler heads before freezing temperatures arrive.
Water left inside pipes can freeze and expand, leading to cracks and damage. According to irrigation experts at
https://www.irrigation.org/
freezing water is one of the leading causes of irrigation system failure. How to Maintain a Sprinkler System
Also learn proper maintenance here:
Why is this important?
- Water left inside pipes can freeze and expand.
- This expansion can cause cracks or bursts.
- Repairs can be expensive and time-consuming.
In simple terms, winterising protects your irrigation system from winter damage.
When Should You Winterise Your Sprinkler System?
Timing is everything when it comes to how to winterise a sprinkler system.
Best Time to Winterise:
- Before the first frost
- When temperatures consistently drop below 0°C (32°F)
- Typically in late fall (October–November)
You can check frost dates using reliable weather tools like
https://www.almanac.com/gardening/frostdates
Understanding water usage also helps protect your system:
How Much Water Does a Sprinkler System Use
Signs It’s Time:
- Cold nights are becoming frequent
- Weather forecasts predict freezing temperatures.
- You’re no longer using your irrigation system.
Don’t wait too long. One freezing night can cause serious damage.
Tools & Equipment Needed to Winterise a Sprinkler System
Before starting, gather these tools:
🔧 Essential Tools:
- Air compressor (for blow-out method)
- Adjustable wrench or pliers
- Screwdriver
- Shut-off valve key
🧤 Safety Gear:
- Safety glasses
- Gloves
🧯 Optional but Recommended:
- Pipe insulation or foam covers
- Towels or rags
Having the right tools makes the process faster and safer.
Types of Sprinkler Systems (Important Before You Start)
Understanding your system helps you apply the correct winterising method.
1. Manual Drain System
- Requires opening drain valves manually
- Simple but needs attention
2. Automatic Drain System
- Drains water automatically when pressure drops
- Easier but still needs inspection
3. Blow-Out System
- Uses compressed air to remove water
- Most effective and widely recommended
👉 Most modern systems use the blow-out method for complete protection.
How to Winterise a Sprinkler System (Step-by-Step)
Now let’s get into the most important part—how to winterise a sprinkler system properly.
🔹 Step 1: Turn Off the Water Supply
Locate your main irrigation shut-off valve and turn it off completely.
✔ This stops water from entering the system.
✔ Usually located in the basement, garage, or outside
🔹 Step 2: Turn Off the Controller
- Switch your irrigation controller to “off” or “rain mode”
- This prevents accidental activation during winter.
🔹 Step 3: Drain the System
Depending on your system:
Manual Drain:
- Open all drain valves
- Let water flow out completely
Automatic Drain:
- Activate the system briefly
- Let pressure drop so water drains
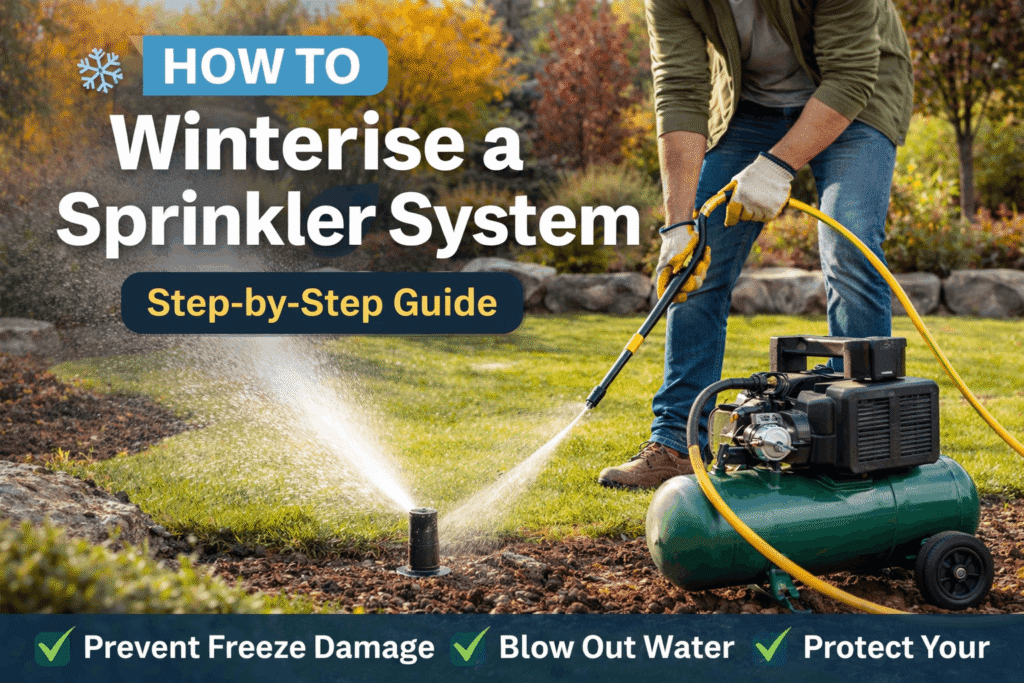
🔹 Step 4: Blow Out the Sprinkler System (Most Important)
This step ensures all remaining water is removed.
- Connect an air compressor to the system
- Blow air through each zone one at a time
- Continue until only air (no water) comes out
⚠️ Never skip this step—it’s the most effective protection.
🔹 Step 5: Insulate and Protect Components
Protect exposed parts like the following:
- Backflow preventer
- Valves
- Pipes
Use foam covers or insulation tape to prevent freezing.
How to Blow Out a Sprinkler System Safely
Blowing out your system is critical but must be done carefully.
✅ Recommended PSI Levels:
- 40–50 PSI for residential systems
- Never exceed 80 PSI
⚠️ Safety Tips:
- Always wear eye protection.
- Blow out one zone at a time
- Avoid standing over sprinkler heads
🚫 Common Mistakes:
- Using too much pressure
- Skipping zones
- Not fully removing water
Doing it correctly ensures maximum protection.
Common Mistakes to Avoid When Winterising
Avoid these common errors when learning how to winterise a sprinkler system:
- ❌ Skipping the blow-out step
- ❌ Using excessive air pressure
- ❌ Forgetting to shut off water supply
- ❌ Not insulating exposed pipes
- ❌ Leaving water in valves
Even small mistakes can lead to costly repairs.
Do You Need a Professional, or Can You DIY?
You can winterise your system yourself—but is it the best option?
✅ DIY Pros:
- Saves money
- Easy for small systems
- Full control
❌ DIY Cons:
- Requires equipment (air compressor)
- Risk of mistakes
👨🔧 Hire a Professional If:
- You have a large system
- You’re unsure about the process.
- You don’t have the right tools.
👉 Beginners can DIY—but professionals ensure zero risk.
How Much Does It Cost to Winterise a Sprinkler System?
The cost depends on your approach.
💵 DIY Cost:
- $0–$50 (if you already have tools)
- $50–$150 (air compressor rental)
👨🔧 Professional Cost:
- $75–$150 (average residential service)
📊 Factors That Affect Cost:
- System size
- Number of zones
- Location
DIY is cheaper, but professionals offer peace of mind.
How Long Does It Take to Winterise a Sprinkler System?
The process is relatively quick.
⏳ Average Time:
- DIY: 30–60 minutes
- Professional: 20–40 minutes
📌 Factors That Affect Time:
- Number of zones
- System complexity
- Experience level
Once you learn how to winterise a sprinkler system, it becomes faster every year.
Conclusion
Learning how to winterise a sprinkler system is one of the smartest things you can do to protect your irrigation investment.
By turning off the water, draining the system, and using the blow-out method, you can prevent frozen pipes and costly repairs. The process is simple, affordable, and can save you hundreds of dollars.
Don’t wait until freezing temperatures arrive—take action early and keep your sprinkler system safe all winter long.
FAQs
1. Can I winterise my sprinkler system without an air compressor?
Yes, but it’s less effective. The blow-out method using an air compressor is the safest and most reliable option.
2. What happens if I don’t winterise my sprinkler system?
Water can freeze inside pipes, causing cracks, leaks, and expensive damage.
3. How much PSI is needed to blow out a sprinkler system?
Typically 40–50 PSI for residential systems. Never exceed 80 PSI.
4. Can sprinkler pipes still freeze after winterising?
If done correctly, the risk is very low. Proper drainage and blow-out are key.
5. Do all sprinkler systems need winterising?
Only systems in cold climates where temperatures drop below freezing.
6. Is it better to hire a professional?
Yes, if you’re unsure or have a large system. DIY works well for smaller systems.
7. How often should I winterise my sprinkler system?
Once every year before the first freeze.