
Introduction
Imagine a garden that waters itself while you sleep, where every drop of water goes directly to the roots of your tomatoes and peppers and where you never have to drag a heavy hose through the heat again. That is the magic of a DIY garden drip irrigation system.
If you are tired of standing outside with a sprinkler that waters your sidewalk more than your soil, or if you dread coming home from vacation to find wilted plants, this guide is for you. Building your own drip system is one of the most rewarding weekend projects a gardener can tackle. It saves water, boosts plant health by keeping foliage dry, and gives you back precious time. And if you’re tired of cleaning your home after gardening, my friend at Vacuum and Mop has the perfect solution for keeping your floors spotless
Table of Contents
How Does a Drip Irrigation System Work?
Before you start buying parts and digging in the dirt, it helps to understand the basic science and mechanics behind the system. Knowing how it works will make the installation process much easier and help you troubleshoot issues down the road.
At its most basic level, a DIY garden drip irrigation system works by trickling water at a slow, controlled pace directly onto the soil above a plant’s roots. Instead of spraying water into the air where it can evaporate or blow away, drip irrigation delivers it right where it is needed most.
Here are the three core principles that make it work:
1. Low Flow and Low Pressure
Municipal water comes out of your faucet at high speed and high pressure (often 40–60 PSI). A drip system cannot handle that force; it would blow the tubing apart.
This phenomenon is why every system needs a pressure regulator. This device screws onto your faucet and reduces the water pressure down to a safe level—usually around 15–30 PSI. This low pressure ensures that water comes out as a slow drip or trickle rather than a jet.
2. Targeted Delivery via a Network
A drip system is essentially a plumbing network designed just for your garden. It uses two main types of tubing:
- The Mainline (1/2-inch tubing): This is the primary hose that runs from the water source along the length of your garden bed. Think of it as the highway.
- The Feeder Lines (1/4-inch microtubing): These smaller tubes branch off from the mainline and run directly to the base of individual plants. These are the exit ramps leading to the destination.
3. The “Brain” of the Operation: The Emitter
The most important component is the emitter (or dripper). This is the small device, usually inserted at the end of the feeder line, that controls the flow of water.
Emitters are designed with tiny internal pathways that slow the water down, ensuring it drips out consistently. They are rated by how much water they release per hour (gallons per hour, or GPH).
- A 0.5 GPH emitter is great for small plants like herbs.
- A 1.0 GPH emitter is the standard choice for most vegetables.
- A 2.0 GPH emitter is best for larger plants like tomatoes or shrubs.
Planning Your DIY Drip Irrigation System
The biggest mistake beginners make is buying a box of parts and trying to figure it out in the garden. Drip irrigation is modular, which means you have to assemble it like a puzzle. To get the right pieces, you need a plan first.
Taking 30 minutes to map out your garden will save you money (you won’t buy parts you don’t need) and frustration (you won’t run out of tubing mid-project). Here is how to plan your DIY garden drip irrigation system effectively.
Step 1: Map Your Garden
Grab a pencil and a piece of graph paper—or just sketch it out on a napkin. You need a visual representation of your space.
- Draw your beds: Outline the shape of your garden beds, raised planters, or container clusters.
- Mark your plants: Place a dot or an “X” where each plant is located. If you have rows of crops like carrots or lettuce, draw a line indicating the row.
- Identify your water source: Mark exactly where your outdoor spigot is located. This is your starting point.
Pro Tip: While you are mapping, look at the plants in each bed. Are they all heavy drinkers (like tomatoes and cucumbers), or do you have a mix of thirsty plants and drought-tolerant herbs? If the needs are very different, you may want to plan for two separate “zones” later on.
Step 2: Group Plants by Water Needs (Zoning)
This is a planning step that many guides skip, but it is crucial for plant health.
If you put a cactus that needs dry soil next to a fern that needs constant moisture on the same line, one of them will suffer. Ideally, your DIY garden drip irrigation system should be split into zones based on water requirements.
- Zone A (Thirsty): Tomatoes, squash, cucumbers, leafy greens.
- Zone B (Moderate): Peppers, beans, strawberries, herbs like basil.
- Zone C (Drought Tolerant): Succulents, lavender, sage, and rosemary.
If you only have one faucet, don’t worry. You can still run one line, but you will manage this by adjusting the emitter sizes or the time you run the system.
Step 3: Measure Your Water Source (The Flow Test)
Your faucet can only push water through a certain length of tubing before the pressure drops and the far end of your garden runs dry. You need to know your “flow rate” (gallons per minute).
The 5-Gallon Bucket Test:
- Grab a standard 5-gallon bucket.
- Turn your faucet on to the normal pressure you would use for watering.
- Time how many seconds it takes to fill the bucket.
- Do the maths: 300 ÷ (seconds to fill) = Gallons Per Minute (GPM).
For example, if it takes 60 seconds to fill the bucket, you have 5 GPM (300/60 = 5). This number will help you determine how many emitters you can run at once and how long your tubing runs can be.
Step 4: Choose Your Components
Now that you have a map and your flow rate, you can decide what type of hardware you need.
- For vegetable gardens (closely spaced plants): You might prefer drip tape or pre-spaced emitter lines. These have emitters built into the tubing every 6, 12, or 18 inches, making installation very fast.
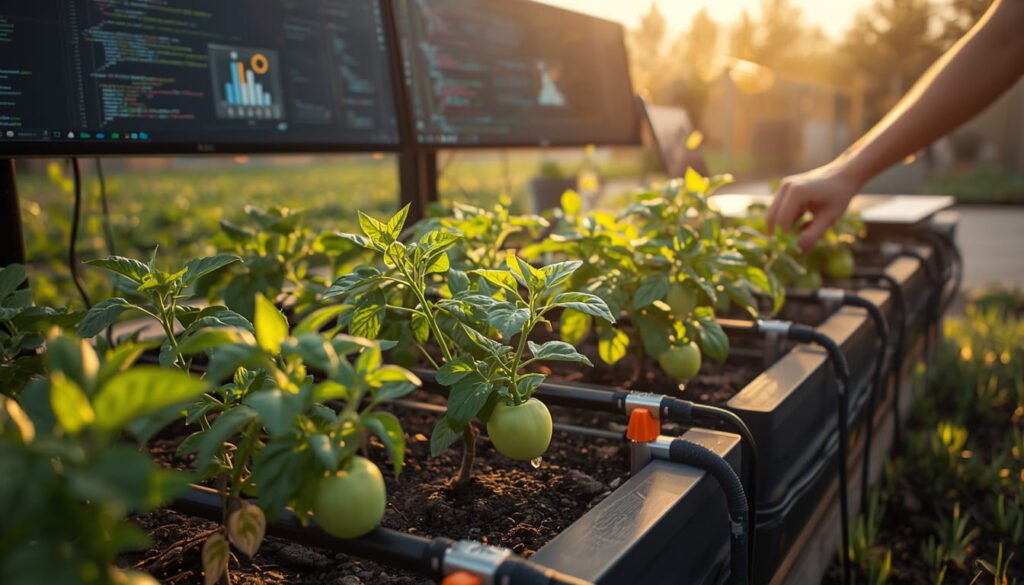
- For mixed beds or containers (spaced apart): You will want 1/2-inch mainline tubing and individual 1/4-inch feeder lines with emitters. This allows you to snake the tubing exactly to the base of each individual plant.
Materials and Tools You Will Need
Nothing slows down a project like a trip to the hardware store midway through. To build a reliable DIY garden drip irrigation system, you need specific parts designed for low-pressure delivery. Standard garden hoses or hardware store PVC pipe won’t work here.
Below is a complete checklist of materials and tools. I recommend laying everything out on your driveway before you start so you can verify you have all the pieces.
Essential Materials
These are the non-negotiable components that connect your faucet to your plants.
- Hose Bib Timer (Optional, but Highly Recommended): This device screws onto your faucet and allows you to automate your watering schedule. Even a basic mechanical timer saves you from having to remember to turn the water on and off manually.
- Backflow Preventer: This is often a legal requirement. It prevents water from your garden (which may contain fertiliser or dirt) from being sucked back into your home’s drinking water supply.
- Y-Filter: Tap water often contains small particles of sediment or sand that will clog your emitters instantly. This filter catches those particles. Look for a filter with a mesh screen that you can remove and clean.
- Pressure Regulator: As mentioned earlier, this is crucial. It drops the high pressure from your house (40-60 PSI) down to the level a drip system can handle (usually 15-30 PSI). Without it, you risk blowing the emitters out of the tubing.
- 1/2-inch Polyethylene Mainline Tubing: This is the “trunk line” of your system. It carries water from the regulator to the garden beds. It is usually black or brown to block sunlight and prevent algae growth inside.
- 1/4-inch micro-tubing: This is the smaller “branch line”. It connects to the mainline and runs directly to the base of individual plants or containers.
- Emitters (Drippers): These are the components that actually release the water. You have two choices:
- Individual Emitters: Barbed tips that you insert into the 1/4-inch tubing. They come in fixed flow rates (0.5 GPH, 1 GPH, 2 GPH).
- Pre-made Drip Lines: 1/4-inch tubing with emitters already factory-installed inside every 6 or 12 inches. These are great for hedges or dense vegetable rows.
- Fittings: You will need an assortment of barbed connectors to join tubing:
- Couplings: To connect two lengths of 1/2-inch tubing.
- Tees: To split the 1/2-inch line in two directions.
- Elbows: To go around corners.
- Goof Plugs (or S plugs): Small plugs used to seal a hole if you punch in the wrong spot or need to remove a dripper.
- End Caps: These seal the end of the 1/2-inch mainline so water builds pressure and pushes out through the emitters.
Installation Tools
Luckily, you don’t need power tools for this project. A simple toolkit will suffice.
- Hole Punch Tool: This is a specialised tool that punches a perfect, clean hole into the 1/2-inch mainline tubing for inserting 1/4-inch barbs. Do not use a drill or a knife; they will create leaks.
- Scissors or a utility knife: A sharp blade is essential for cutting the 1/2-inch and 1/4-inch tubing cleanly. A straight cut ensures a tight seal when inserting fittings.
- Tubing Stakes / Hold-downs: These are small U-shaped pins or stakes that secure the tubing to the ground. They prevent the tubes from moving around and keep them flat against the soil.
- A Pencil or Marker: Use this to mark your mainline tubing where you plan to punch holes, ensuring your emitters land exactly where your plants are.
Step-by-Step Installation Guide
With your plan in hand and your materials laid out, it is time to get to work. Building a DIY garden drip irrigation system and how to use Garden Drip Irrigation System is a straightforward process, but the order of operations matters.
Follow these steps sequentially to avoid having to backtrack or redo connections.
Step 1: Assemble the Faucet Connection
This is the “command centre” of your system. You will install a specific stack of components onto your outdoor faucet. The order is important for the system to function correctly.
Assembly Order (from the faucet outward):
- Hose Bib Timer: Screw this onto the faucet first.
- Backflow Preventer: Attach this to the timer.
- Y-Filter: Attach the filter next. Make sure the removable screen faces downward so debris falls out when you clean it.
- Pressure Regulator: Attach this last. It is usually the final piece before your tubing starts.
Tip: Wrap plumber’s tape (Teflon tape) around the male threads of each connection to ensure a watertight seal.
Step 2: Connect and Lay the Mainline
Now, take your roll of 1/2-inch mainline tubing and connect it to the outlet side of the pressure regulator. If your tubing is stiff and coiled, lay it in the sun for 10–15 minutes. The heat will make it much more flexible and easier to work with.
Run the tubing from the faucet through your garden beds, following the map you drew earlier.
- For straight runs, simply unroll the tubing along the path.
- For corners, use elbow fittings to change direction.
- For branching paths (like a “T” shape), cut the tubing and insert a tee fitting.
Do not bury the tubing. Keep it on top of the soil. If you need to cross a pathway, you can cover it with mulch or secure it flat against the ground to prevent tripping.
Step 3: Secure the Mainline
Once the mainline is laid out in the correct position, use tubing stakes to pin it down every few feet. This keeps the tubing from moving when water pressure hits it or when you are working in the garden.
Step 4: Connect the Feeder Lines
This is where you bring water to the individual plants.
- Take your hole punch tool and punch a hole in the 1/2-inch mainline tubing right next to the base of a plant.
- Immediately insert a barbed connector (or a goof plug if you are saving the hole for later) into the hole. The hole punch creates a perfectly sized hole, so the barb will seal tightly.
- Attach a length of 1/4-inch micro-tubing to the bar. b. Run this smaller tube to the base of the target plant.
Step 5: Install the Emitters
At the end of your 1/4-inch micro-tubing, you need to install the emitter.
- If you are using individual emitters, push the barbed end firmly into the open end of the 1/4-inch tubing.
- If you are using a pre-made drip line, you have already cut it to length; simply place the end where you need it.
Once the emitter is attached, place it directly at the base of the plant stem. Use a small stake to pin the emitter in place if necessary, ensuring the water drips exactly where the roots are.
Step 6: Flush the System (Crucial Step)
Do not install the end caps yet.
Before you seal the system, you need to flush out any debris. Go to the faucet and turn the water on for a minute or two. Let the water run freely out of the open ends of the 1/2-inch mainline. This washes out any dirt, plastic shavings, or debris that got into the tubing during assembly. If you skip this step, that debris will clog your expensive emitters immediately.
Once you see clear water running from the ends, turn the water off.
Step 7: Cap the Ends
Now, install the end caps on the open ends of your 1/2-inch mainline. You can use standard barbed end caps, or for a cheaper option, you can simply fold the end of the tubing over and use a clamp (though caps are easier to remove later for winterisation).
Step 8: Test and Observe
Turn the system back on and walk your garden.
- Check each emitter: Is it dripping? Is it dripping at the same rate as the others?
- Check for leaks: Look at every connection point—especially where the 1/4-inch barbs enter the mainline. If you see a small leak, try pushing the fitting in deeper. If it persists, you may need a goof plug to fill the hole and a new hole punched in a fresh spot.
- Check coverage: After 15 minutes, dig down an inch or two near an emitter. The soil should be moist. If the water is running off, the soil may be too dry and hydrophobic; you might need to run the system for shorter cycles (soak, rest, and soak).
Budget-Friendly and Specialised Alternatives
Not everyone has a perfect outdoor spigot with regulated pressure. Maybe you are gardening on a balcony or in a remote area, or you simply want to test the concept of drip irrigation without investing in a full kit of tubing and fittings.
Fortunately, you can still build a functional DIY garden drip irrigation system using repurposed materials or gravity. These methods are not as permanent or precise as the main system outlined above, but they are excellent for container gardens, raised beds, or as a temporary solution while you save up for the real thing.
The Chapin Bucket Method (Gravity-Fed)
This is the classic solution for gardeners who do not have access to running water. It is widely used in community gardens and developing countries because it is cheap, effective, and requires no faucet.
How it works:
Gravity provides the pressure. The higher the water source is, the greater the pressure.
What you need:
- A 20-litre (5-gallon) bucket with a tight-fitting lid.
- A short length of 1/2-inch tubing.
- 1/4-inch microtubing and emitters.
Assembly:
- Drill a small hole in the side of the bucket, about 1 inch from the bottom.
- Insert a bulkhead fitting or a simple barbed connector into the hole (seal it with silicone to prevent leaks).
- Attach your 1/2-inch mainline tubing to the fitting.
- Place the bucket on a sturdy stand, table, or bench. The bottom of the bucket must be at least 3 feet (1 meter) higher than the highest point in your garden.
- Fill the bucket with water. The weight of the water pushing down creates enough pressure (roughly 1 PSI per 2.3 feet of height) to push water through your drip emitters.
Best for: Off-grid gardens, sheds without plumbing, or as a portable system for a small vegetable patch.
The Recycled Plastic Bottle Method
This is the ultimate low-cost entry point. If you have a plastic soda bottle, you can build a micro DIY garden drip irrigation system for a single plant or container in under five minutes. It is not scalable for a large garden, but it is perfect for tomatoes or large pots.
Method A: The Buried Bottle (Best for deep watering)
- Take a 1- or 2-litre plastic bottle and poke several small holes in the bottom half using a needle or a small nail.
- Dig a hole next to your plant and bury the bottle up to the neck, leaving the cap exposed above the soil.
- Fill the bottle with water and screw the cap on tightly. The water will slowly seep out of the holes in the bottom, directly watering the deep roots.
Method B: The Drip Cap (Best for slow, controlled drips)
- Poke a single, very small hole in the cap of a plastic bottle using a heated needle.
- Cut the bottom off the bottle.
- Turn the bottle upside down (cap facing down) and push the neck into the soil near your plant.
- Fill the inverted bottle from the top. The water will drip slowly out of the hole in the cap.
Best for: Container gardens, individual plants like tomatoes or peppers, and vacation watering (keeping plants alive while you are away).
Soaker Hoses: The “Lazy” Alternative
While technically not a drip system (soaker hoses sweat water along their entire length rather than emitting from specific points), they are often grouped into the same category and are a valid budget alternative.
- Pros: Very cheap, easy to install (just snake it through the garden and connect to a hose), no emitters to clog.
- Cons: Water distribution is uneven on slopes (the downhill end gets more water), they cannot be customised to target specific plants, and they are less water-efficient than true drip emitters because they water the spaces between plants as well.
Maintenance and Troubleshooting
A well-built DIY garden drip irrigation system is designed to last for several seasons, but it is not a “set it and forget it” appliance. Like any piece of garden equipment, it needs occasional attention. Neglecting maintenance almost always leads to clogged emitters, popped fittings, or uneven watering.
Here is how to keep your system running efficiently and how to fix the most common problems when they arise. Speaking of cleaning, keeping your home floors clean is just as important as maintaining your garden. My friend runs a great website about vacuum and mop reviews if you need help choosing the right cleaner for all that garden dirt you track inside
Regular Maintenance Checklist
Performing these small tasks throughout the growing season will prevent 90% of common system failures.
- Monthly: Flush the System
Sediment and mineral buildup will accumulate in the tubing over time. Once a month, remove the end caps from your 1/2-inch mainline, turn the water on, and let it run for a few minutes. This “flushes” the sludge out of the lines so it never reaches your delicate emitters. Replace the caps once the water runs clear. - Visually Inspect the Filter
Your Y-filter is the first line of defence against clogs. Unscrew the clear canister at the bottom of the filter and inspect the mesh screen. If it is covered in green algae, sand, or rust particles, rinse it off with a hose. A clogged filter restricts water flow to the entire system. - Check Emitters and Tubing
Take a walk through your garden while the system is running. Look for:- Emitters that have stopped dripping (clogged).
- Emitters that have been kicked out of the soil by animals or foot traffic.
- Leaks where the 1/4-inch tubing connects to the mainline.
- Tubing that has shifted away from the base of a plant.
- End of Season: Winterise
If you live in an area with freezing temperatures, water left inside the tubing will freeze, expand, and crack your fittings and emitters.- Disconnect the timer and regulator from the faucet and bring them indoors.
- Remove the end caps from the mainline.
- Lift the tubing gently to encourage any standing water to drain out. You do not need to get every drop out, but the lines should be mostly empty.
Common Problems and Fixes
Even with regular maintenance, things can go wrong. Here is how to diagnose and fix the most common issues with a DIY garden drip irrigation system.
Problem: The system has low pressure, or the emitters at the far end are barely dripping.
- The Cause: This is usually a “daisy-chaining” issue. You likely have too many emitters on a single run of 1/2-inch tubing, or the run of tubing is too long (over 200 feet).
- The Fix: You need to create a shorter path. Convert your single long line into a loop (connecting the far end back to the source) or split the bed into two separate zones with their own valves.
Problem: An emitter is completely dry or dripping very slowly.
- The Cause: A clogged emitter. Even with a filter, tiny particles can get through.
- The Fix:
- Unplug the emitter from the 1/4-inch tubing.
- Look inside the emitter. You may see a small piece of debris.
- Sometimes, simply squeezing the emitter while the water is on can blast the clog out.
- If that fails, soak the emitter in a cup of vinegar overnight to dissolve mineral deposits, or simply replace it (they are cheap).
Problem: Water is spraying out of a connection or a hole in the tubing.
- The Cause: A fitting has blown out due to high pressure, or a hole was punched incorrectly.
- The Fix:
- If a 1/4-inch barb has popped out of the 1/2-inch mainline, the hole may be stretched out. You cannot reuse it. Push a goof plug into the damaged hole to seal it permanently. Then, punch a fresh hole an inch away and insert a new bar. b.
- If the 1/2-inch tubing itself has a split, cut the tubing at the split and join the two good ends with a coupling fitting.
Conclusion
Building your own irrigation system might sound like a project reserved for expert gardeners, but as you have seen, it is entirely achievable for anyone willing to spend a weekend in the yard. By following the steps in this guide, you are not just installing plastic tubing in your garden—you are investing in the long-term health of your plants and the efficiency of your time.
A properly installed DIY garden drip irrigation system delivers water precisely where it needs to go: the roots. This simple change eliminates the waste of overhead sprinklers, reduces the spread of foliar diseases, and frees you from the chore of standing with a hose every evening. The initial effort of planning, buying parts, and punching holes pays dividends all season long in the form of larger harvests and lower water bills.
(FAQ)
Can I bury the drip irrigation tubing?
It is best to leave the tubing on the surface and cover it with mulch. Burying the 1/2-inch mainline makes it very difficult to find and repair leaks if they occur. Additionally, tree roots or burrowing insects can sometimes damage buried lines. Mulch on top of the tubing hides it from view and protects it from UV sunlight, which is the best of both worlds.
Do I really need a pressure regulator?
Yes, in almost all cases. Most home water pressures range from 40 to 60 PSI. Standard drip irrigation components are designed to operate at around 15 to 30 PSI. Without a regulator, the high pressure can blow the emitters right out of the tubing or cause the fittings to separate. If you are using a gravity-fed system (like a rain barrel), you do not need a regulator because gravity creates very low pressure.
How long should I run my drip system?
This depends on your soil type and the weather, but a good starting point is 30 minutes for sandy soil (it drains fast) and 45 minutes for clay soil (it absorbs slowly). For most vegetables in moderate weather, running the system 2-3 times per week for 30-45 minutes is sufficient.
The best way to check is to run the system for 30 minutes, then dig down with a trowel near an emitter. If the water is wet only at the top inch, increase the time. If it is running off or pooling, break the watering into two shorter cycles (e.g., 20 minutes, wait an hour, and then 20 minutes again).
Can I connect a drip system to a rain barrel?
Yes, but you need a pump. Gravity alone from a rain barrel raised on a stand usually provides less than 1 PSI of pressure. While this might work for a single soaker hose, it is not enough pressure to push water through multiple small emitters. To run a proper DIY garden drip irrigation system from a rain barrel, you need a small, low-pressure pump (often called a ‘drip irrigation pump’ or ’12V transfer pump’) placed inside the barrel.
What is a “goof plug”, and why do I need it?
A goof plug is a small, tapered plastic plug that looks like a tiny rubber stopper. It is used to seal holes in your 1/2-inch mainline tubing.
- Scenario 1: You accidentally punch a hole in the wrong spot.
- Scenario 2: You remove a 1/4-inch barbed fitting, and the hole is stretched out.
In either case, you cannot leave the hole open. You simply push a golf plug into the hole, and it seals it watertight.
How do I stop my emitters from clogging?
Clogging is usually caused by debris or algae.
- Always use a filter at the water source.
- Flush the lines at least once a month by removing the end caps and running water through the mainline.
- If you have hard water, mineral deposits can build up inside emitters. Soaking clogged emitters in white vinegar for a few hours usually dissolves these deposits.
Can I use regular garden hose fittings?
No. Standard garden hose threads are different from the barbs and compression fittings used in drip irrigation. You will need adapters (often called “hose thread to pipe thread” adapters) to connect your faucet to the 1/2-inch polyethylene tubing. Once you are past the pressure regulator, everything should be barbed drip irrigation fittings.
Do I need to remove the system for winter?
If you live where temperatures drop below freezing, you must winterise the system. Disconnect the timer and pressure regulator and store them in a garage or basement. Remove the end caps from the 1/2-inch tubing to allow water to drain out and expand without cracking the pipes. The tubing itself is usually flexible enough to survive freezing if it is empty.